I love to share what I've learnt with others. Check out my blog posts and notes about my
academic research, as well as technical solutions on software engineering and data
science challenges. Opinions expressed in this blog are solely my own.
Few days ago, I realized that the coverage test for my python package, which was run on travis-ci.org, has stopped running for two years. After migrating the to travis-ci.com, the service is no longer free after spending 10000 credits. One has to pay for $69/mo 💸 for unlimited service.
Note that I already used 2170 credits when testing various things and preparing for upcoming package release in a day 😱(my fault?), so I don’t think a free plan is sustainable, but $69/mo is definitely too expensive if I only have to maintain a single package.
I found a free solution on GitHub marketplace: CodeCov. With this GitHub Action, one can run deployment test and code coverage diagnostic automatically when pushing commits. I spent a bit of time on trial and error, so I think it is worth the time to write down what I did to save time for others.
Define the workflow
The GitHub Workflow is defined in the file .github/workflows/workflow.yml. Here is what I did for my package:
In order to upload the coverage report to CodeCov, I used the command bash <(curl -s https://codecov.io/bash) after failing to send report using the line uses: codecov/codecov-action@v2 from CodeCov template.
Specify files to include/exclude in the coverage test
The specifications are made in the file .coveragerc:
In the previous discussion I led, I introduced the idea of learning visual representation in unsupervised manner. This week, I am introducing the following paper that applies deep contrastive learning to train sentence embedding:
You can find here the slides I made which provides an introduction to Contrastive Learning. Below are the main points from the slides:
Contrastive learning is a self-supervised method to learn a representation of objects by maximizing/minimizing distance between the same/different class(es)
Contrastive learning benefits from data augmentation and increase in model parameters
Under-clustering occurs when there is not enough negative samples to learn from; over-clustering occurs when the model overfits (memorize the data)
To solve inefficiency issue, median(rank-k) triplet loss is used instead of the total loss
🎹 I have been uploading improvised piano cover on my YouTube channel. Recently, I received some comments asking for the music sheet of my arrangement, and it seems to be a good idea to keep a record of my work. Therefore, I started making music sheets of my arrangement with MuseScore to share with others.
🎼 Check out the page Music Arrangement for the collection of arrangement with music sheets I’ve made. For the rest of my recordings, go to my YouTube Channel Clare’s Studio.
I passed the Databricks Certified Associate Developer exam for Apache Spark 3.0 (python). Here is my certificate!
I registered for the exam when joining the Spark Summit this June, hoping to set a goal to push myself to dive deeper into spark architecture and performance tuning.
[Experience sharing] On top of coding with pyspark at work (which helps me with most of the syntax questions in the exam), my exam preparation mainly involves reading the two books, Spark: The Definitive Guide and Learning Spark 2.0.
It was my very first time taking an online proctored exam at home, and there were two things I wish I could have known before the exam:
The spark documentation (PDF file) provided by Sentinel (i.e., the exam software) is not searchable. One has to scroll through the page to find what s/he needs.
The proctor would check your workspace configuration during the exam (i.e., not at the beginning). The exam would pause during the check, so you don’t have to worry about losing time.
I believe there will be more tests conducted with an online proctor given the evolution of the pandemic. Perhaps we will get used to the online test workspace setup at home very soon.
When I was trying to set up a conda environment to run a package…
ERROR: After October 2020 you may experience errors when installing or updating packages. This is because pip will change the way that it resolves dependency conflicts.

We recommend you use --use-feature=2020-resolver to test your packages with the new resolver before it becomes the default.

numpydoc 1.1.0 requires sphinx>=1.6.5, but you'll have sphinx 1.5.3 which is incompatible.
It’s HacktoberFest again! 👻 Here are some useful commands to merge your forked repo with upstream changes from the original repo (Also see GitHub Docs).
After forking, specify remote upstream repository:
To give indices to hierarchical labels, I can use DENSE_RANK() or RANK() depending on the situation.
For example, if I have a DataFrame that looks like this:
How to construct a custom Transformer that can be fitted into a Pipeline object? I learned from a colleague today how to do that.
Below is an example that includes all key components:
frompysparkimportkeyword_onlyfrompyspark.mlimportTransformerfrompyspark.ml.param.sharedimportHasInputCol,HasOutputCol,Param,Params,TypeConvertersfrompyspark.ml.utilimportDefaultParamsReadable,DefaultParamsWritablefrompyspark.sqlimportDataFramefrompyspark.sql.typesimportStringTypeimportpyspark.sql.functionsasFclassCustomTransformer(Transformer,HasInputCol,HasOutputCol,DefaultParamsReadable,DefaultParamsWritable):input_col=Param(Params._dummy(),"input_col","input column name.",typeConverter=TypeConverters.toString)output_col=Param(Params._dummy(),"output_col","output column name.",typeConverter=TypeConverters.toString)@keyword_onlydef__init__(self,input_col:str="input",output_col:str="output"):super(CustomTransformer,self).__init__()self._setDefault(input_col=None,output_col=None)kwargs=self._input_kwargsself.set_params(**kwargs)@keyword_onlydefset_params(self,input_col:str="input",output_col:str="output"):kwargs=self._input_kwargsself._set(**kwargs)defget_input_col(self):returnself.getOrDefault(self.input_col)defget_output_col(self):returnself.getOrDefault(self.output_col)def_transform(self,df:DataFrame):input_col=self.get_input_col()output_col=self.get_output_col()# The custom action: concatenate the integer form of the doubles from the Vector
transform_udf=F.udf(lambdax:'/'.join([str(int(y))foryinx]),StringType())returndf.withColumn(output_col,transform_udf(input_col))
[hn2016_falwa Release 0.4.1] A minor release of my python package hn2016_falwa is published. Thanks Christopher Polster for submitting a pull request that fixes the interface of BarotropicField. Moreover, I added procedures to process masked array in QGField such that it can be conveniently used to process ERA5 data which is stored as masked array in netCDF files.
As a memo to myself - procedures for a release (which I often forget and have to google 😅):
[Updated on 2023/11/5] Update version number in:
setup.py,
readme.md
falwa/__init__.py
docs/source/conf.py
recipe/meta.yaml
Add a (light-weighted) tag to the commit: git tag <tagname>.
Not only push the commits but also the tag by git push origin <tagname>.
Update on Aug 15, 2021: To push the commit and corresponding tag simultaneously, use
git push --atomic origin <branch name> <tag>
If I have time, I would update the version on PYPI too:
Create the dist/ directory and the installation files: python3 setup.py sdist bdist_wheel
Upload the package onto TestPyPI to test deployment: python3 -m twine upload --repository testpypi dist/*
Deploy the package onto PyPI for real: python3 -m twine upload dist/*
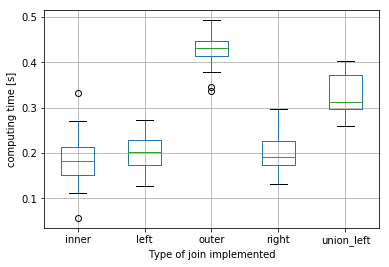
Today I learned from a colleague the way of doing outer join of large dataframes more efficiently: instead of doing the outer join, you can first union the key column, and then implement left join twice. I have done an experiment myself on the cluster with two dataframes (df1 and df2) - each dataframe has ~10k rows, and there is only ~10% of overlap(i.e. an inner-join would result in ~1k rows).
Here is the distribution of computing times for inner, left, outer, right and union-left(that gives same results as outer) joins(I repeated each join 20 times):
For these sizes of dataframes, the union-left join is on average ~20% faster than the equivalent outer join.
[hn2016_falwa Release 0.4.0] 😄I am happy to announce that the climate data analysis in Nakamura and Huang(2018, Science) for the southern hemisphere is also available on GitHub now! (Finally, I have time to do a thorough check of the code and make the release…)
If you have any questions/issues regarding the usage of the package, feel free to post on the Issue page of the repo! I will help you fix them soon as I can!