CS topics not covered in class
27 Jun 2024Our team lead shared with us some useful learning materials on advanced CS topics not covered in class: The Missing Semester of Your CS Education from MIT. I’ll spend some time to read this.
I love to share what I've learnt with others. Check out my blog posts and notes about my
academic research, as well as technical solutions on software engineering and data
science challenges.
Opinions expressed in this blog are solely my own.
Our team lead shared with us some useful learning materials on advanced CS topics not covered in class: The Missing Semester of Your CS Education from MIT. I’ll spend some time to read this.
I led the Machine Learning Journal Club discussion on the paper:
Liu, Z., Wang, Y., Vaidya, S., Ruehle, F., Halverson, J., Soljačić, M., … & Tegmark, M. (2024). Kan: Kolmogorov-arnold networks. arXiv preprint arXiv:2404.19756.
Here are the slides I made.
In short, I believe it can only be practically useful if the scalability problem is solved. 👀 Let’s see how the development of this technique goes.
Below is the email I sent to the users of GitHub repo hn2016_falwa:
I am writing to inform you two recent releases of the GitHub repo v1.0.0 (major release) and v1.1.0 (a bug fix). You can refer to the release notes for the details. There are two important changes in v1.0.0:
The python package is renamed from hn2016_falwa to falwa since this package implements finite-amplitude wave activity and flux calculation beyond those published in Huang and Nakamura (2016). The GitHub repo URL remains the same: https://github.com/csyhuang/hn2016_falwa/ . The package can be installed via pip as well: https://pypi.org/project/falwa/
It happens that the bug fix release v0.7.2 has a bug in the code such that it over-corrects the nonlinear zonal advective flux term. v1.0.0 fix this bug. Thanks Christopher Polster for spotting the error. The fix requires re-compilation of fortran modules.
The rest of the details can be found in the release notes:
Please let us know on issue page if you have any questions: https://github.com/csyhuang/hn2016_falwa/issues
Bookmarking some useful links:
The deployment of python package on linux is not working (again). I am exploring solutions to automate deployment. Here are things I’ve found.
fastscapelib-f2py: https://anaconda.org/conda-forge/fastscapelib-f2py/[Updated on 2023/12/11] After some research, it seems that scikit-build would be a continuously maintained solution: https://scikit-build.readthedocs.io/
to be continued.
We published an important bugfix release hn2016_falwa v0.7.2, which requires recompilation of fortran modules.
Two weeks ago, we discovered that there is a mistake in the derivation of expression of nonlinear zonal advective flux term, which leads to an underestimation of the nonlinear zonal advective flux component.
We will submit corrigendum for Neal et al. (2022, GRL) and Nakamura and Huang (2018, Science) to update the numerical results. The correct derivation of the flux expression can be found in the corrected supplementary materials of NH18 (to be submitted soon). There is no change in conclusions in any of the articles.
Please refer to Issue #83 for the numerical details and preliminary updated figures in NHN22 and NH18:
Thank you for your attention and let us know if we can help.
Here are course notes I am taking from the DeepLearning.ai course on Coursera: Generative AI with Large Language Models.
To build pip distribution that contains the source files only (without compiled modules):
python3 setup.py sdist bdist_wheel
python3 -m twine upload dist/*
To compile the package to .whl on Mac (Example: SciPy pip repository):
python setup.py bdist_wheel
python3 -m twine upload dist/*
This deploy the wheel file dist/hn2016_falwa-0.7.0-cp310-cp310-macosx_10_10_x86_64.whl to pip channel.
However, when repeating the Mac procedures above on Linux, I got the error:
Binary wheel 'hn2016_falwa-0.7.0-cp311-cp311-linux_x86_64.whl' has an unsupported platform tag 'linux_x86_64'.
I googled and found this StackOverflow thread: Binary wheel can’t be uploaded on pypi using twine.
ManyLinux repo: https://github.com/pypa/manylinux
Good tutorial:
http://www.martin-rdz.de/index.php/2022/02/05/manually-building-manylinux-python-wheels/
Create fresh start environment:
$ conda create --name test_new
But using conda on mac to compile wheel would have this issue:
ld: unsupported tapi file type '!tapi-tbd' in YAML file
Related thread: https://developer.apple.com/forums/thread/715385
Create virtual environment (not via conda)
python3 -m venv /Users/claresyhuang/testbed_venv
source /Users/claresyhuang/testbed_venv/bin/activate
The google slides used in my presentation in the meeting of NOAA Model Diagnostics Task Force can be found here.
Thrilled that my open-source climate data analysis package gets sponsored by JetBrains Licenses for Open Source Development. 🥳
I’m really glad I started this project in 2016 when I was still in graduate school, with the hope that the climate data diagnostic proposed in my thesis can be applied by other more easily. Even though I have been working in industry after finishing my PhD, by maintaining this package, I’ve established valuable connections with many academic researchers. 😊 I’m grateful that JetBrains support open-source community and encourage the culture of sharing.
JetBrains Licenses for Open Source Development: https://www.jetbrains.com/community/opensource/
It took me a while to figure out how to import cython modules. Here is a configuration that works:
├── hn2016_falwa
│   ├── cython_modules
│   |   ├── pyx_modules
|   |   |   ├── __init__.py
|   |   |   ├── dirinv_cython.pyx
|   |   ├──setup_cython.py
|   |   ├──check_import.py
...
In dirinv_cython.pyx I have:
def x_sq_minus_x(x):
    return x**2 - x
In setup_cython.py I have:
from distutils.core import setup
from Cython.Build import cythonize

setup(name='dirinv_cython',
      package_dir={'pyx_modules': ''},
      ext_modules=cythonize("pyx_modules/dirinv_cython.pyx"))
First, I compile the cython modules by executing in the directory cython_modules:
python setup_cython.py build_ext --inplace
This produces dirinv_cython.c in the directory pyx_modules/.
Put this in __init__.py:
import dirinv_cython
Then I run the script to test the imports check_import.py:
from pyx_modules import dirinv_cython

ans = dirinv_cython.x_sq_minus_x(19)
print(f"ans = {ans}")
Executing check_import.py gives
ans = 342
This blog post is motivated by the Scikit-learn documentation of QuantileTransformer and a StackExchange discussion thread about it.
There are 2 parts in this post. Part I reviews the idea of Quantile Transformer. Part II shows the implementation of Quantile Transformer in Spark using Pandas UDF.
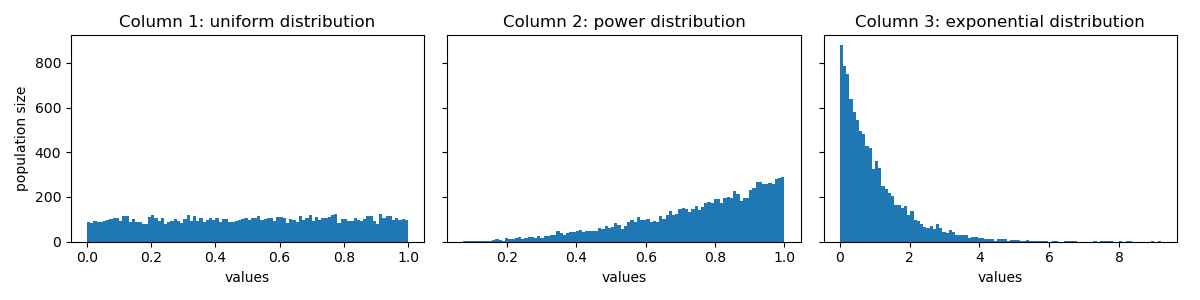
Problem Statement: I have some individuals (id) with 3 attributes of different distributions. I want to combine them linearly and also want to make sure the outcome follows a normal distribution.
In python, I create a toy dataset with column id, and 3 columns corresponding to random variables following different distributions:
import numpy as np
import pandas as pd
import scipy
import math
import matplotlib.pyplot as plt

num_of_items = 10000  # the size of my population

df = pd.DataFrame({
    'id': [str(i) for i in np.arange(num_of_items)],
    'uniform': np.random.rand(num_of_items),
    'power_law': np.random.power(3, num_of_items),
    'exponential': np.random.exponential(1, num_of_items)})
The first 5 rows of df looks like
 id   uniform  power_law  exponential
  0  0.543253   0.690897     0.523969
  1  0.161339   0.802748     0.808497
  2  0.487836   0.818129     1.409843
  3  0.594641   0.808148     2.233953
  4  0.513764   0.783795     1.841159
Here is a visualization of their distributions:
To transform all the columns to normal distribution, first, get the rank (or quantile, if rank is too expensive) for each id in each column:
df_rank = df.rank(
    axis=0, method='average', numeric_only=True, na_option='keep', ascending=True, pct=True)
The first 5 rows of df_rank looks like:
   uniform  power_law  exponential
0   0.5351     0.3388       0.4099
1   0.1544     0.5243       0.5543
2   0.4814     0.5546       0.7586
3   0.5882     0.5351       0.8950
4   0.5053     0.4885       0.8427
Let’s say we want to map these values to a normal distribution with mean=0.5 and standard deviation=0.15. To look up the corresponding value in the CDF of normal distribution, we can use scipy.stats.norm.ppf:
df_transformed = df_rank.applymap(lambda col: scipy.stats.norm.ppf(col, loc=0.5, scale=0.15))
The first 5 rows of df_transformed looks like:
    uniform  power_law  exponential
0  0.513214   0.437639     0.465830
1  0.347339   0.509142     0.520480
2  0.493004   0.520594     0.605271
3  0.533438   0.513214     0.688035
4  0.501993   0.495675     0.650843
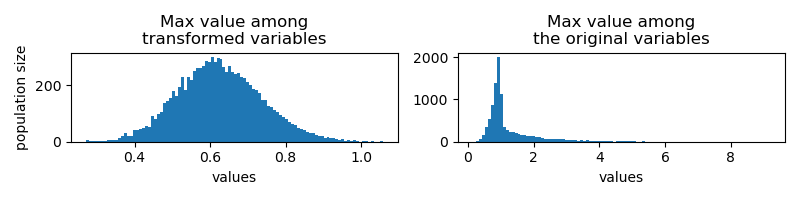
Let’s see how the distribution of values in df_transformed look like:
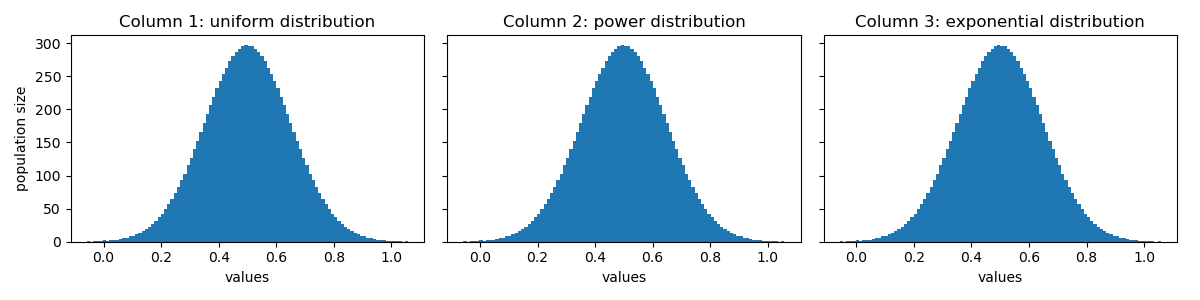
Perfect! Their distributions look identical now! 😝
If I do a uniform linear combination of them per id,
df_transformed['linear_combination'] = df_transformed.apply(
    lambda row: np.mean([row['uniform'], row['power_law'], row['exponential']]), axis=1)
I would get results of the same distribution. On the right, I show the results from linear combination of the original values for comparison:
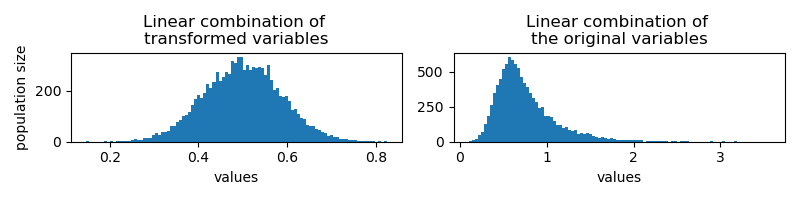
Another combination strategy would be to get the max value among the 3 columns. The transformed variable follows similar distribution, dispute the mean shifts to larger values.
Given the introduction of Pandas UDF in Spark, the implementation is relatively simple. If ranking is too expensive, you can consider using approximate quantile instead.
from pyspark.sql.functions import pandas_udf, PandasUDFType

@pandas_udf(PandasUDFType.SCALAR)
def to_normal_distribution(data: pd.Series):
    pdf = data.rank(pct=True)\
        .applymap(lambda col: scipy.stats.norm.ppf(col, loc=0.5, scale=0.15))
    return pdf
(Note: Later I realized that the newest Spark version has pyspark.pandas.DataFrame.rank, see Spark documentation. That’s not available at my work station yet.)
You can append the transformed value to the original dataframe:
spark_df = spark_session.createDataFrame(df)
spark_df = spark_df.withColumn(
    'transformed_data',
    to_normal_distribution(spark_df.uniform))
I have a dataframe df with columns id (integers) and document (string):
root
 |-- id: integer
 |-- document: string
Each id is associated with multiple documents. Each document would be transformed into a vector representation (embedding of dimension 100) using Spark NLP. Eventually, I want to get the average of vectors associated with each id.
When testing with small amount of data, i.e. 10k id with each associated with ~100 document, pyspark.ml.stat.Summarizer does the job quickly:
df.groupby('id').agg(Summarizer.mean(F.col('embedding')).alias('mean_vector'))
However, the real situation is that I have to deal with Big Data that consists of 100M distinct id and 200M distinct document. Each id can be associated with at most 30k document. The time taken to (1) attach embedding using Spark NLP and (2) aggregate the vectors per id took me 10 hours, which is too slow!
Eventually, I figured out a way to do the same thing while having the computing time shortened to ~2 hours.
Thanks to my colleague who spot out the bottleneck - step (1) is indeed not slow. It was step (2) that takes most of the time when there is a huge number of id to work with. In this scenario, the aggregation of values in 100 separate columns is actually faster than the aggregation of 100-dimension vectors.
Here is what I do to optimize the procedures:
documentOne can specify in sparknlp.base.EmbeddingFinisher whether you want to output a vector or an array. To make the split easier, I set the output as array:
from sparknlp.base import EmbeddingFinisher
...

finisher = EmbedingFinisher() \
    .setOutputAsVector(False) \
    ...
Now I have document_df of schema
root
 |-- document: string
 |-- embedding: array
 |    |-- element: float
I split the vectors into 100 columns (v1, v2, … v100) by:
import pyspark.sql.functions as F

split_to_cols = [F.col('embedding')[i].alias(f'v{i}') for i in range(1, 101)]
document_df = document_df.select([F.col('document')] + split_to_cols)
I then join document_df to df and obtain the average of embedding columns per id:
avg_expr = [F.mean(F.col(f'v{i}')).alias(f'v{i}') for i in range(1, 101)]
df = df.join(document_df, on='document').groupby('id').agg(*avg_expr)
One can turn the values in the 100 columns to a vector per id if needed:
from pyspark.ml import VectorAssembler

assembler = VectorAssembler(
    inputCols=[f'v{i}' for i in range(1, 101)],
    outputCol='final_vector')
df = assembler.transform(df) \
    .select('id', 'final_vector')
That’s how I speed up the aggregation of Vector output from Spark NLP. Hope that helps. 😉
Sometimes, hive tables are saved not in an optimal way that creates lots of small files and reduce the performance of the cluster. This blog post is about pyspark functions to reduce the number of files (and can shrink storage size when the data is indeed sparse).
To check the number of files and their size, I used this HDFS command:
$ hadoop cluster_name fs -count /hive/warehouse/myschema.db/
There will be 4 columns printed out. I’m showing one of the examples among the table I shrank today:
| Directory count | File count | Content size | Table name |
|---|---|---|---|
| 3 | 854 | 104950877 | original_table_w_many_small_files |
When I check the file sizes of the 854 files using hadoop cluster_name fs -du -h /hive/warehouse/myschema.db/original_table_w_many_small_files/*/*/*, I find that all of them are indeed of small size:
99.9 K  /hive/warehouse/myschema.db/original_table_w_many_small_files/some_part_id=30545/timestamp=1595397053/part-00845-29c4c506-e991-4d1d-be67-43e0a9976179.c000
102.7 K  /hive/warehouse/myschema.db/original_table_w_many_small_files/some_part_id=30545/timestamp=1595397053/part-00846-29c4c506-e991-4d1d-be67-43e0a9976179.c000
104.4 K  /hive/warehouse/myschema.db/original_table_w_many_small_files/some_part_id=30545/timestamp=1595397053/part-00847-29c4c506-e991-4d1d-be67-43e0a9976179.c000
100.6 K  /hive/warehouse/myschema.db/original_table_w_many_small_files/some_part_id=30545/timestamp=1595397053/part-00848-29c4c506-e991-4d1d-be67-43e0a9976179.c000
98.8 K  /hive/warehouse/myschema.db/original_table_w_many_small_files/some_part_id=30545/timestamp=1595397053/part-00849-29c4c506-e991-4d1d-be67-43e0a9976179.c000
108.5 K  /hive/warehouse/myschema.db/original_table_w_many_small_files/some_part_id=30545/timestamp=1595397053/part-00850-29c4c506-e991-4d1d-be67-43e0a9976179.c000
106.5 K  /hive/warehouse/myschema.db/original_table_w_many_small_files/some_part_id=30545/timestamp=1595397053/part-00851-29c4c506-e991-4d1d-be67-43e0a9976179.c000
101.9 K  /hive/warehouse/myschema.db/original_table_w_many_small_files/some_part_id=30545/timestamp=1595397053/part-00852-29c4c506-e991-4d1d-be67-43e0a9976179.c000
65.5 K  /hive/warehouse/myschema.db/original_table_w_many_small_files/some_part_id=30545/timestamp=1595397053/part-00853-29c4c506-e991-4d1d-be67-43e0a9976179.c000
To combine the files, the following was what I do with a pyspark (jupyter) notebook.
First of all, I check the schema of the table using SHOW CREATE TABLE myschema.original_table_w_many_small_files:
CREATE TABLE myschema.original_table_w_many_small_files (
  `some_id` BIGINT,
  `string_info_a` STRING,
    ...
  `some_part_id` INT,
  `timestamp` BIGINT)
USING orc
PARTITIONED BY (some_part_id, timestamp)
TBLPROPERTIES (
  ... )
I create a table called myschema.new_table_with_fewer_files in parquet format instead:
CREATE TABLE myschema.new_table_with_fewer_files (
  `some_id` BIGINT,
  `string_info_a` STRING,
    ...
  `some_part_id` INT,
  `timestamp` BIGINT)
USING PARQUET
PARTITIONED BY (some_part_id, timestamp)
Then, I retrieved the original table and repartitioned it, such that all data in each partition is combined to a single file (numPartitions=1) since my cluster can handle files of size up to 100 M. You shall adjust numPartitions based on the resources you have.
df = spark.table('myschema.original_table_w_many_small_files')
df.repartition(numPartitions=1).write.insertInto('myschema.new_table_with_fewer_files')
Here is a comparison between the storage of the old and new table:
| Table name | Directory count | File count | Content size |
|---|---|---|---|
| original_table_w_many_small_files | 3 | 854 | 104950877 |
| new_table_with_fewer_files | 7 | 4 | 14866996 |
When checking the table size using human readable format hadoop fs -du -h, I find that the table has been shrunk from 100.1 M to 39.6 M.
It came to our attention that one of the terms in the LWA budget as computed in the currently published code on my GitHub may require correction. This concerns the meridional convergence of eddy momentum flux, which is currently evaluated in the displacement coordinate (Φ’), where it should really be evaluated in the real latitude (Φ).
The discrepancy does not affect the zonal mean budget of wave activity, but it may cause spurious residual/sources/sinks locally if not corrected.
Noboru and I are currently assessing the error that this causes in our previous results and we will let you know as soon as we find out.
In the meantime, if you want to correct your diagnostic by yourself, the remedy is relatively simple (adding a correction term) – please see the write-up from Noboru on GitHub. If you have specific questions or concerns, we’ll be happy to help.
Our contact method:
Today I led the Machine Learning Journal Club discussion on the paper:
Dhariwal, P., & Nichol, A. (2021). Diffusion models beat gans on image synthesis. Advances in Neural Information Processing Systems, 34, 8780-8794.
This time instead of making slides for overview, I put the focus of discussion on the trick, i.e. Classifier Guidance (section 4 of the paper), which makes the whole thing work well.
Great thanks to Christopher Polster who submitted a pull request to include Xarray interface to the QGField class of the local wave activity package. 😄 Please find here the release note for version 0.6.1.
I learned something new cleaning up the GitHub repo and I’m gonna write about it.
There are actually two places which you can define the files to be ignored by git:
.gitignore: I used to have this locally. Christopher suggested I include that in the GitHub repo for everyone’s use, and I think that’s a better idea..git/info/exclude: This is indeed the right place to specify personal files to be excluded (not shared on the repo).In test_xarrayinterface.py, I modified the xarray import statement:
try:
    import xarray as xr
except ImportError:
    pytest.skip("Optional package Xarray is not installed.", allow_module_level=True)
Given that xarray is an optional package, even if it is not installed, unit test for this package shall still run through.
The .f90 files that contain the f2py modules were located in hn2016_falwa/ before. Now it is moved to hn2016_falwa/f90_modules/. The modifications done are:
(1) In setpy.py, the extension is changed to something like:
ext4 = Extension(name='interpolate_fields_direct_inv',
                 sources=['hn2016_falwa/f90_modules/interpolate_fields_dirinv.f90'],
                 f2py_options=['--quiet'])
The compiled modules of suffix .so will be located in hn2016_falwa/ with this change.
(2) Add in hn2016_falwa/__init__.py:
from .interpolate_fields import interpolate_fields
...
from .compute_lwa_and_barotropic_fluxes import compute_lwa_and_barotropic_fluxes
To debug, go to https://readthedocs.org/projects/hn2016-falwa/ and look at the Builds. Even if it passes, the document may not be compiled properly. Go to View raw and check out all warnings/errors to see if you have a clue.
The fix I have done are:
docs/source/conf.py:
autodoc_mock_imports indocs/requirements.txt and specify all external packages imported (i.e. numpy, scipy, xarray) in the packageTo display the difference between two commits using GitHub’s web interface, put in the following URL:
https://github.com/csyhuang/hn2016_falwa/compare/OLD-COMMIT-HASH..NEW-COMMIT-HASH
I led the Machine Learning Journal Club discussion on the paper:
Houlsby, N., Giurgiu, A., Jastrzebski, S., Morrone, B., De Laroussilhe, Q., Gesmundo, A., … & Gelly, S. (2019, May). Parameter-efficient transfer learning for NLP. In International Conference on Machine Learning (pp. 2790-2799). PMLR.
Here are the slides I made.
I led the Machine Learning Journal Club discussion on the paper:
Chuang, Y. S., Dangovski, R., Luo, H., Zhang, Y., Chang, S., Soljačić, M., … & Glass, J. (2022). DiffCSE: Difference-based Contrastive Learning for Sentence Embeddings. arXiv preprint arXiv:2204.10298.
Here are the slides I made.
Our newest research paper:
Neal, Emily, Huang C. S. Y., Nakamura N. The 2021 Pacific Northwest heat wave and associated blocking: meteorology and the role of an upstream diabatic source of wave activity. Geophysical Research Letters (2021)
is available online!
Check out the latest release of my python package that includes the scripts and new reference state inversion algorithm to reproduce the analyses.😄