I love to share what I've learnt with others. Check out my blog posts and notes about my
academic research, as well as technical solutions on software engineering and data
science challenges. Opinions expressed in this blog are solely my own.
After opening an account on pythonanywhere,
go to the Web tab and select Add a new web app.
When prompted to select a Python Web framework, choose Flask.
Choose your python version. Here, I am choosing Python 3.6 (Flask 0.12).
Enter a path for a Python file I wish to hold my Dash app. I entered:
/home/username/mysite/dashing_demo_app.py
Put the script of your Dash app in dashing_demo_app.py. You can use the script in the sample file
dashing_demo_app.py
provided on the GitHub repo of pythonanywhere’s staff.
Next I have to set up a virtual environment that the app is running in. I am using the
requirements3.6.txt
provided in the above GitHub repo.
Go to the Files tab to create requirements3.6.txt in your home directory. Then,
go to the Consoles tab to start a new bash session.
Create a virtual environment dashappenv with the following command in the home directory:
Then, go to the Web tab and enter under Virtualenv the path of your virtual environment:
/home/username/.virtualenvs/dashappenv
Lastly, modify your WSGI file. Instead of
from dashing_demo_app import app as application
provided, enter
from dashing_demo_app import app
application = app.server
to import your app.
It’s all done. Go to Web to reload your app. You can then click the URL of your webapp and see it running. :)
Here is the sample webapp I built based on the example in
Dash tutorial.
Here is the
press release
from UChicago about the publication.
For interested researchers, the sample script to reproduce the results can be found in the directory
nh2018_science
of the my python package’s GitHub repo hn2016_falwa.
You can download ERA-Interim reanalysis data with download_example.py to run the local wave
activity and flux analysis in the jupyter notebook demo demo_script_for_nh2018.ipynb.
Have fun and feel free to email me (csyhuang at uchicago.edu) if you are interested
in using the code and/or have questions about it.
In Step 5, you have to include the .jar files in the directory CoreNLP/lib and
CoreNLP/liblocal in your CLASSPATH. To do this, first, I install coreutils:
brew install coreutils
such that I can use the utility realpath there. Then, I include the following in my ~/.bashrc:
for file in `find /Users/clare.huang/CoreNLP/lib/ -name "*.jar"`;
  do export CLASSPATH="$CLASSPATH:`realpath $file`";
done

for file in `find /Users/clare.huang/CoreNLP/liblocal/ -name "*.jar"`;
  do export CLASSPATH="$CLASSPATH:`realpath $file`";
done
(I guess there are better ways to combine the commands above. Let me know if there are.)
To run CoreNLP, I have to download the latest version of it, and place it in the directory
CoreNLP/:
The latest version is available on
their official website. Unzip
it, and add all the .jar there to the $CLASSPATH.
Afterwards, you shall be able to run CoreNLP with the commands provided
in the blogpost of Khalid Alnajjar
(under Running Stanford CoreNLP Server). If you have no problem starting the server,
you shall be able to see the interface on your browser at http://localhost:9000/:
With brew cask installed on Mac (see homebrew-cask instructions),
different versions of java can be installed via the command (I want to install java9 here, for example):
brew tap caskroom/versions
brew cask install java9
After installing, the symlink /usr/bin/java is still pointing to the old native Java. You can check
where it points to with the command ls -la /usr/bin/java. It is probably pointing to the old native
java path:
/System/Library/Frameworks/JavaVM.framework/Versions/Current/Commands/java
.
However, homebrew installed java into the directory
/Library/Java/JavaVirtualMachines/jdkx.x.x_xxx.jdk/Contents/Home.
To easily switch between different java environments, you can use jEnv. The installing
instructions can be found on jEnv’s official page.
The ECMWF API Python Client is now available on pypi and anaconda.
The Climate Corporation has distributed the ECMWF API Python Client on
pypi. Now it can be installed via:
pip install ecmwf-api-client
Anaconda users on OS X/linux system can install the package via:
conda install -c bioconda ecmwfapi
To use the sample script, you need an API key ( .ecmwfapirc ) placed in your home directory. You can retrieve that by logging in: https://api.ecmwf.int/v1/key/
Create a file named “.ecmwfapirc” in your home directory and put in the content shown on the page:
After doing that, in the directory with the sample script example.py, you can test the package by running it:
python example.py
You should see it successfully retrieves a .grib file if the package has been set up properly.
There are sample scripts
available on the ECMWF website (look under “Same request NetCDF format”). Below is a example of python
script I wrote to retrieves zonal wind, meridional wind and temperature data at all pressure levels
during the time period 2017-07-01 to 2017-07-31 in 6-hour intervals:
The publication page
has been updated with 3 submitted manuscripts.
Updates on Feb 9, 2018: The manuscript “Role of Finite-Amplitude Rossby Waves and Nonconservative
Processes in Downward Migration of Extratropical Flow Anomalies” has been accepted by Journal of Atmospheric Sciences.
The subroutine
wrapper.qgpv_eqlat_lwa_ncforce for computing effective diffusivity, which quantifies the
damping on wave transiences by irreversible mixing in the stratosphere during a
stratospheric sudden warming event, can be found in my python package.
I am interested in going through the exercise from Princeton University’s
Algorithm course. I found someone
wrote a handy bash script to set up the environment on Mac OS/Linux:
I have updated my python library hn2016_falwa to
v0.2.0 (see release note! Now
it includes functions to compute the contribution of non-conservative forces to wave activity.
Moreover, the documentation page generated
with Sphinx is now hosted on readthedocs.org! Check it out!
A side note: somehow I made multiple commits to remedy mistake. The git commands to squash
the (3, for example) commits are:
git rebase -i origin/master~3 master
git push origin +master
(Ideally, I shall run tensorflow somewhere else rather than on my MacBook.)
When I install keras with Anaconda on my Mac OS X, with tensorflow as the backend, the following warning comes up when
running the sample script:
I tensorflow/core/platform/cpu_feature_guard.cc:137] Your CPU supports instructions that this TensorFlow binary was not compiled to use: SSE4.1 SSE4.2 AVX AVX2 FMA
To use those instructions (SSE4.1 SSE4.2 AVX AVX2 FMA), tensorflow has to be compiled from source. The instructions are available here.
Using the following command to build the source:
Today I wanted to setup an automated kickstarter scraper on Python Anywhere but realized that
only MySQL is freely supported there (while I’ve been using PostgreSQL). So, a time to switch?
Here is how I install MySQL on my Mac and have it accessed with SQLAlchemy:
Go to System Preferences to start the MySQL server.
Navigate to the bin directory and login with the temporary password shown at the end of the installation:
cd /usr/local/mysql/bin
./mysql -u root -p
Create another set of username and password that you use instead of root.
CREATE USER username@localhost IDENTIFIED BY 'password'
I have installed pymysql and sqlalchemy in Python to access the MySQL database. To access the database:
fromsqlalchemyimportcreate_enginefromsqlalchemy_utilsimportdatabase_exists,create_database# dbname is the database name
# user_id and user_password are what you put in above
engine=create_engine("mysql+pymysql://%s:%s@localhost:3306/%s"%(user_id,user_password,dbname),echo=False)ifnotdatabase_exists(engine.url):create_database(engine.url)# Create database if it doesn't exist.
con=engine.connect()# Connect to the MySQL engine
table_name='new_table'command="DROP TABLE IF EXISTS new_table;"# Drop if such table exist
con.execute(command)
On my way building a webapp with python and Flask, I need to include input options to make the app interactive. Here are some great sites I’ve learnt things from:
I’ve published a new paper on Geophysical Research Letters!
Climate dynamicists have derived a conservation relation based on small-amplitude wave assumption for wave activity (A) that describes evolution of Rossby wave packets:
However, only the wave activity flux vector on the RHS has been used to diagnose realistic climate data. A is ill-defined when wave amplitude is large (i.e. ‘of finite-amplitude’). In Huang & Nakamura (2016), we introduced a new theory of wave activity applicable to large waves. We thus can obtain a well-defined A even from real data. This is the first piece of work that compare LHS and RHS of the conservative part of equation above for reanalysis data. This advance allows us to estimate the overall non-conservative contribution (natural/human-induced forcings) to the observed flow.
Major results include:
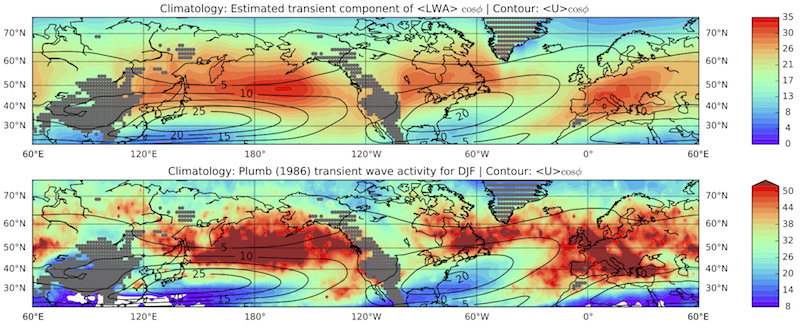
(1) Our estimation of transient wave activity (top panel) is consistent with previous work (bottom panel, assuming small-amplitude waves) and is better behaving.
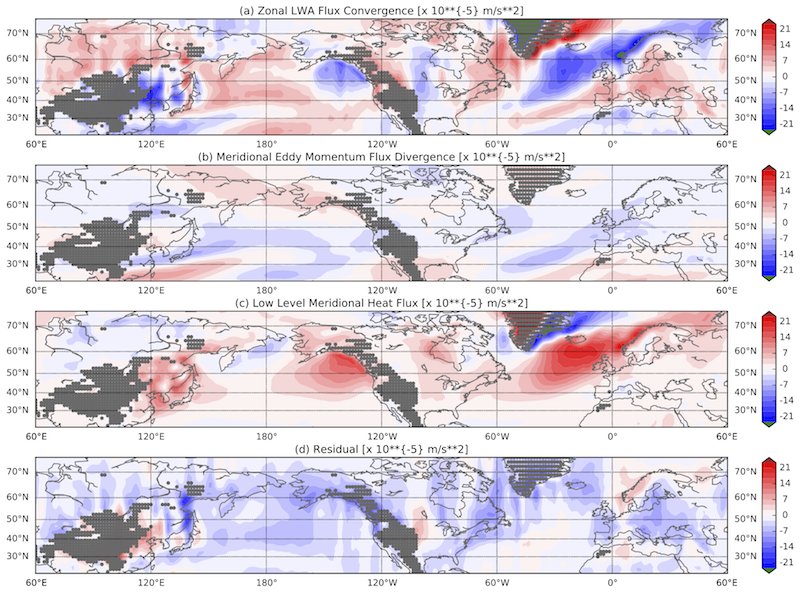
(2) We can break down the local wave activity budget at seasonal time-scale.
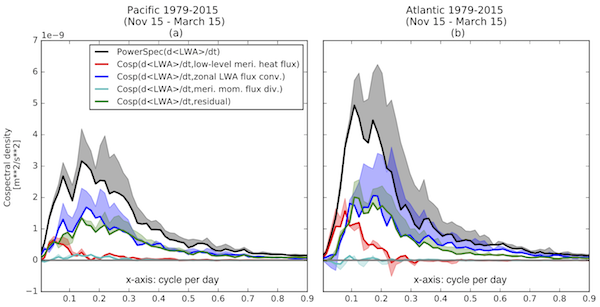
(3) We can also break down the budget in synoptic time-scale with the use of co-spectral analysis.