Reading Notes on Spark - The Definitive Guide
18 Apr 2020I am reading the book Spark: The Definitive Guide by Bill Chambers, Matei Zaharia. Here are my reading notes:
I love to share what I've learnt with others. Check out my blog posts and notes about my
academic research, as well as technical solutions on software engineering and data
science challenges.
Opinions expressed in this blog are solely my own.
I am reading the book Spark: The Definitive Guide by Bill Chambers, Matei Zaharia. Here are my reading notes:
Found a workable solution adding “read more” button to jekyll posts from Jonny Langefeld’s blog post. 😄 Thanks for the solution!
Today I learned from a colleague the way of doing outer join of large dataframes more efficiently: instead of doing the outer join, you can first union the key column, and then implement left join twice. I have done an experiment myself on the cluster with two dataframes (df1 and df2) - each dataframe has ~10k rows, and there is only ~10% of overlap(i.e. an inner-join would result in ~1k rows).
The usual way of doing outer join would be like:
df3 = df1.join(df2, how='outer', on='id').drop_duplicates()
Here is an equivalent way(I call it union-left here) that takes less time to compute:
df3 = df1.select('id').union(df2.select('id'))
df3 = df3.join(x1_df, how='left', on='id')
df3 = df3.join(x2_df, how='left', on='id').drop_duplicates()
The distribution of IDs in the two dataframes:
| df1 only | overlap | df2 only | |
|---|---|---|---|
| # of ids | 8625 | 914 | 8623 |
Here is the distribution of computing times for inner, left, outer, right and union-left(that gives same results as outer) joins(I repeated each join 20 times):
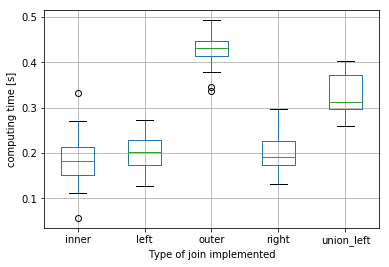
For these sizes of dataframes, the union-left join is on average ~20% faster than the equivalent outer join.
[hn2016_falwa Release 0.4.0] 😄I am happy to announce that the climate data analysis in Nakamura and Huang(2018, Science) for the southern hemisphere is also available on GitHub now! (Finally, I have time to do a thorough check of the code and make the release…)
Check out the release note for enhanced functionality:
https://github.com/csyhuang/hn2016_falwa/releases/tag/0.4.0
The documentation page has been fixed too:
https://csyhuang.github.io/hn2016_falwa
Jupyter notebook demonstrating the usage of the functions:
https://github.com/csyhuang/hn2016_falwa/blob/master/examples/nh2018_science/demo_script_for_nh2018.ipynb
If you have any questions/issues regarding the usage of the package, feel free to post on the Issue page of the repo! I will help you fix them soon as I can!
Learned from colleagues some points to pay attention to when writing SQL queries. (This post will be updated from time to time.)
Always specify the partition in the where clause. If you have to retrieve data from several partitions, loop through it one-by-one.
Note that the two queries
SELECT DISTINCT(item) FROM table_X
and
SELECT item FROM table_X
GROUP BY item
give the same result. However, the second SQL query will be executed faster. There is no difference calling distinct and group by via (py)spark though.
Always use where to filter the table to be joined to the smallest, e.g.
SELECT c.* FROM credit c
INNER JOIN (
	SELECT date, item FROM purchase
	WHERE date > 20190207
) p
ON c.date = p.date
WHERE c.eligibility = True
Note that the line WHERE c.eligibility = True is executed to filter the table credit before the JOIN. This shrinks the table credit to the smallest before joining.
This is not about work but for fun :D
I recently started learning bouldering (2.5 months till now?) and that’s lots of fun! I keep updating a comic series - the Matchman Bouldering Series - on Instagram/Tumblr that records the ideas I learned from friends in every session collaborating with my college friend Martin.
Some previews…

If you are fond of bouldering and have practical/physics ideas to share, ping me and see if we can collaborate! :)
Pandas dataframe can be converted to pyspark dataframe easily in the newest version of pandas after v0.19.2. If you are using an older version of pandas, you have to do a bit more work for such conversion as follows.
First, load the packages and initiate a spark session.
from pyspark.sql import SparkSession, DataFrame, Row
import pandas as pd

spark = SparkSession.builder \
        .master("local") \
        .appName("Pandas to pyspark DF") \
        .getOrCreate()
Here is an example of pandas dataframe to be converted.
df = pd.DataFrame({'index':[i for i in range(7)],
                   'alphabet':[i for i in 'pyspark']})
df.head(7)
| index | alphabet | |
|---|---|---|
| 0 | 0 | p |
| 1 | 1 | y |
| 2 | 2 | s |
| 3 | 3 | p |
| 4 | 4 | a |
| 5 | 5 | r |
| 6 | 6 | k |
To convert it to a pyspark dataframe, one has to create a list of Row objects and pass it into createDataFrame:
df_pyspark = spark.createDataFrame([
    Row(index=row[1]['index'], alphabet=row[1]['alphabet'])
    for row in df.iterrows()
])
df_pyspark.show()
+--------+-----+
|alphabet|index|
+--------+-----+
|       p|    0|
|       y|    1|
|       s|    2|
|       p|    3|
|       a|    4|
|       r|    5|
|       k|    6|
+--------+-----+
Exploding gradients and vanishing gradients are two common issues with the training of RNN.
To avoid exploding gradients, one may use:
Vanishing gradients are harder to detect. To avoid it, one may use:
Suppose I have a Hive table that has a column of sequences,
+------------------+
|          sequence|
+------------------+
|      [3, 23, 564]|
+------------------+
how to generate a column that contains permutations of each sequence in multiple rows? The desired output shall look like:
+------------------+------------------+
|          sequence|       permutation|
+------------------+------------------+
|      [3, 23, 564]|      [3, 23, 564]|
|      [3, 23, 564]|      [3, 564, 23]|
|      [3, 23, 564]|      [23, 3, 564]|
|      [3, 23, 564]|      [23, 564, 3]|
|      [3, 23, 564]|      [564, 3, 23]|
|      [3, 23, 564]|      [564, 23, 3]|
+------------------+------------------+
In order to get multiple rows out of each row, we need to use the function explode. First, we write a user-defined function (UDF) to return the list of permutations given a array (sequence):
import itertools
from pyspark.sql import SparkSession, Row
from pyspark.sql.types import IntegerType, ArrayType

@udf_type(ArrayType(ArrayType(IntegerType())))
def permutation(a_list):
    return list(itertools.permutations(a_list, len(a_list)))
The udf_type function is adapted from the blog post by John Paton. The output type is specified to be an array of “array of integers”.
The application of this function with explode will yield the result above:
df = spark_session.createDataFrame([Row(sequence=[3, 23, 564])])

result = df.withColumn('permutation', F.explode(permutation(F.col('sequence'))))
This post is related to the idea discuss in the post “How to Solve Non-Serializable Errors When Instantiating Objects In Spark UDFs”. Here I discuss the solution in a hypothetical scenario in pyspark.
import pyspark.sql.functions as F
from pyspark.sql.functions import udf
from pyspark.sql.types import IntegerType

class AnimalsToNumbers(object):
    def __init__(self, spark):
        self._mapping = {'elephant': 1, 'bear': 4, 'cat': 9}
        self._spark = spark

    def addition(self, animal_str):
        return sum([self._mapping.get(x, 0)
                    for x in animal_str.split('+')])

    def add_up_animals(self, df):
        addition_udf = F.udf(self.addition, IntegerType())
        return df.withColumn('sum', addition_udf('animal'))
(In practical cases, self._mapping is a huge object containing the dictionary and other attributes that are derived from methods in the AnimalsToNumbers class.) If I want to transform a dataframe df that looks like this:
+-------------+
|       animal|
+-------------+
|elephant+bear|
|     cat+bear|
+-------------+
The operation
AnimalsToNumbers(spark).add_up_animals(df)
will lead to an error like this:
---------------------------------------------------------------------------
Py4JError                                 Traceback (most recent call last)
~/anaconda3/envs/pyspark_demo/lib/python3.5/site-packages/pyspark/serializers.py in dumps(self, obj)
    589         try:
--> 590             return cloudpickle.dumps(obj, 2)
    591         except pickle.PickleError:
...
PicklingError: Could not serialize object: Py4JError: An error occurred while calling o25.__getstate__. Trace:
py4j.Py4JException: Method __getstate__([]) does not exist
	at py4j.reflection.ReflectionEngine.getMethod(ReflectionEngine.java:318)
	at py4j.reflection.ReflectionEngine.getMethod(ReflectionEngine.java:326)
	at py4j.Gateway.invoke(Gateway.java:274)
	at py4j.commands.AbstractCommand.invokeMethod(AbstractCommand.java:132)
	at py4j.commands.CallCommand.execute(CallCommand.java:79)
	at py4j.GatewayConnection.run(GatewayConnection.java:238)
	at java.lang.Thread.run(Thread.java:748)
The issue is that, as self._mapping appears in the function addition, when applying addition_udf to the pyspark dataframe, the object self (i.e. the AnimalsToNumbers class) has to be serialized but it can’t be.
A (surprisingly simple) way is to create a reference to the dictionary (self._mapping) but not the object:
class AnimalsToNumbers(object):
    def __init__(self, spark):
        self._mapping = {'elephant': 1, 'bear': 4, 'cat': 9}
        self._spark = spark


    def add_up_animals(self, df):
        mapping = self._mapping
        def addition(animal_str):
            return sum([mapping.get(x, 0) for x in animal_str.split('+')])

        addition_udf = F.udf(addition, IntegerType())
        return df.withColumn('sum', addition_udf('animal'))
AnimalsToNumbers(spark).add_up_animals(df).show() would yield:
+-------------+---+
|       animal|sum|
+-------------+---+
|elephant+bear|  5|
|     cat+bear| 13|
+-------------+---+
Yay :)
Found a useful cheatsheet that listed out operations on JSON in PostgreSQL.
If I want to list the rows where column col1 in table table1 contains a JSON object with the key key1, I can use:
select * from table1
where col1->'key1' IS NOT NULL
The python package hn2016_falwa has just been updated with the following changes:
unittest to pytesthn2016_falwa.download_data.retrieve_erai to download ERA-Interim data (but not connected to the main program yet)My package uses f2py. When switching from unittest to pytest, there are several changes to make in setup.py and .travis to accommodate such usage:
In setup (numpy.distutils.core.setup), remove the argument
test_suite='tests.my_module_suite'
and add:
    packages=find_packages(),
    setup_requires=['pytest-runner'],
    tests_require=['pytest'],
In .travis, the script section looks like:
script:
  - python setup.py pytest
I visited the Department of Atmospheric and Oceanic Sciences at the University of Wisconsin-Madison for two days and had a lot of fun discussing atmospheric (and machine learning) research with the scientists there. Thanks Prof. Jon Martin for inviting me over!
The colloquium I gave on Monday was an overview of the finite-amplitude local Rossby wave activity theory and its application to study blocking. We learned from this framework that atmospheric blocking can be modelled as a traffic jam problem. I also mentioned the follow-up work by Paradise et al. (2019, JAS) that discusses the implication of this notion.
The slides for my colloquium can be found below:

Bookmarking some papers mentioned in Andrew Ng’s course Sequence Models:
Cho, K., Van Merriënboer, B., Bahdanau, D., & Bengio, Y. (2014). On the properties of neural machine translation: Encoder-decoder approaches. arXiv preprint arXiv:1409.1259.
Chung, J., Gulcehre, C., Cho, K., & Bengio, Y. (2014). Empirical evaluation of gated recurrent neural networks on sequence modeling. arXiv preprint arXiv:1412.3555.
(More to update)
Below are solutions I curated online to solve problems related to Git when collaborating with others and working on several branches together. This post will be updated from time to time.
To copy a file to the current branch from another branch (ref)
git checkout another_branch the_file_you_want.txt
To merge changes from another branch to yours, you can use merge or rebase depending on the preferred commit order. BitBucket has a nice tutorial discussing the difference btween the two. Usually I’d love to have the changes pulled from another branch as a single commit with git merge.
git checkout master      # the branch with changes
git pull                 # pull the remote changes to local master branch
git checkout mybranch    # go back to mybranch
git merge master         # incorporate the changes into mybranch
git revertUseful tutorial from BitBucket on git revert.
If you want to compare the difference between your (more updated) branch and the master branch, use the command
git diff master..your_branch
You can save the comparison results into a text file with colors by
git diff master..your_branch > your_branch_to_master.diff
The color can be viewed when you open the .diff file with Sublime.
use the following command
git config --global credential.helper osxkeychain
[to be continued]
When researching on different machine learning models for modeling languages (i.e. sequence model), here are some useful resources I found online:
I wanted to load the libsvm files provided in tensorflow/ranking into PySpark dataframe, but couldn’t find existing modules for that. Here is a version I wrote to do the job. (Disclaimer: not the most elegant solution, but it works.)
from pyspark import SparkContext
from pyspark.sql import SparkSession, Row
from pyspark.ml.linalg import SparseVector
Initiate a spark session for creation of dataframe.
sc = SparkContext("local", "read_libsvm")
spark_session = SparkSession \
    .builder \
    .appName("read_libsvm") \
    .getOrCreate()
Get the path to the data files.
_TRAIN_DATA_PATH="data/train.txt"
_TEST_DATA_PATH="data/test.txt"
Here is the module I wrote for the purpose:
def read_libsvm(filepath, query_id=True):
    '''
    A utility function that takes in a libsvm file and turn it to a pyspark dataframe.

    Args:
        filepath (str): The file path to the data file.
        query_id (bool): whether 'qid' is present in the file.

    Returns:
        A pyspark dataframe that contains the data loaded.
    '''

    with open(filepath, 'r') as f:
        raw_data = [x.split() for x in f.readlines()]

    train_outcome = [int(x[0]) for x in raw_data]

    if query_id:
        train_qid = [int(x[1].lstrip('qid:')) for x in raw_data]

    index_value_dict = list()
    for row in raw_data:
        index_value_dict.append(dict([(int(x.split(':')[0]), float(x.split(':')[1]))
                                       for x in row[(1 + int(query_id)):]]))

    max_idx = max([max(x.keys()) for x in index_value_dict])
    rows = [
        Row(
            qid=train_qid[i],
            label=train_outcome[i],
            feat_vector=SparseVector(max_idx + 1, index_value_dict[i])
        )
        for i in range(len(index_value_dict))
    ]
    df = spark_session.createDataFrame(rows)

    return df
Let’s see how the train and test sets look like in the tf-ranking package:
train_df = read_libsvm(_TRAIN_DATA_PATH)
test_df = read_libsvm(_TEST_DATA_PATH)

train_df.show(5)
+--------------------+-----+---+
|         feat_vector|label|qid|
+--------------------+-----+---+
|(137,[5,13,17,42,...|    0|  1|
|(137,[11,13,18,30...|    2|  1|
|(137,[11,27,29,39...|    2|  1|
|(137,[5,10,26,31,...|    1|  1|
|(137,[13,17,22,24...|    2|  2|
+--------------------+-----+---+
only showing top 5 rows
test_df.show(5)
+--------------------+-----+---+
|         feat_vector|label|qid|
+--------------------+-----+---+
|(137,[2,7,37,40,4...|    1|  1|
|(137,[1,8,12,15,2...|    2|  1|
|(137,[4,11,15,16,...|    0|  1|
|(137,[14,19,20,33...|    0|  1|
|(137,[9,12,19,26,...|    1|  2|
+--------------------+-----+---+
only showing top 5 rows
Here is a curation of some solutions to simple problems encountered when working with pyspark.
from pyspark.sql.functions import *
new_df = df.withColumn(col_name, regexp_replace(col_name, pattern, replacement))
df = left_df.join(right_df, ["name"])
Found a useful article: How to Access Your Ubuntu Bash Files in Windows (and Your Windows System Drive in Bash).
On my way figuring out how to properly write unit test for my python package, I have come across the useful pages below:
Unit tests are worth the time writing to make sure your package works as you expected. I also found some commercial packages using unit tests as sample script for user to refer to (e.g. AllenNLP).